INTRODUCTION: The following tutorials were something I promised to do for Shadow Guard as part of the Raven Wing Project I am working on for him. Most are quick and easy. They aren't meant to give you tips on winning a golden demon or any other painting prize. They are however a way to have a decent looking army in a short amount of time. Many times in these tutorial your going to see non-GW paint names. I have nothing against GW paint, I think it is great stuff. The bottles for it on the other hand..bleh. So where possible I will include a GW equivalent (or close enough for government work) for the colors I use. That said, please understand that these are how I do these particular things. It is not the Games Workshop way, the Cool Mini or Not way, heck some might say it is not even the "right" way. All I can promise is that it works and if you choose to follow it, your army will at least be presentable on the table. Above anything though I hope that folks who are looking to start painting or improve their painting can learn something. So any comments / critiques you want to fire at me feel free: [ email: menshakhaine@hotmailcom ] |
PAINTING MASTERCLASS DEATHWING By Matthew Hunt ( Kurgan ) |


PAINTING THE UNFORGIVEN |


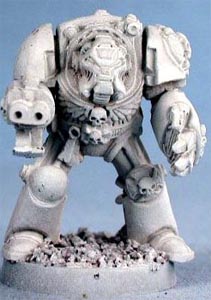
Step 1 - Here is one of the few times I use white as my primer coat. The same colour scheme can be applied to represent the Angels of Absolution. |
">

">
">
">
">
">
">
">
">
">
">
">
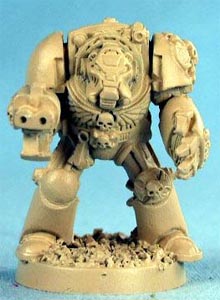
Step 2 - A base coat of Bleached Bone is applied. This can either be sprayed on or brushed on. Whatever toots your horn. |
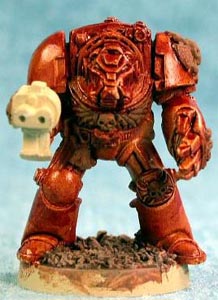
Step 3 - Here I deviate from most folks and how they do Deathwing. I give the entire mini a flesh wash inking. Areas that will be skull white are not inked however. They are just given a coat of East Indian Brown (Graveyard Earth or Desert Yellow will work here as well). |
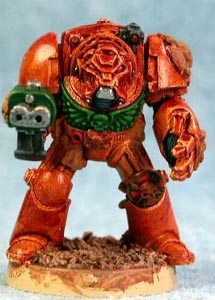
Step 4 - Step 4 is a multi-purpose step I go through and anything that won't be bone or skull white in the end gets done at this point. |
">
">
">
">
">
">
">
">
">
">
">
">
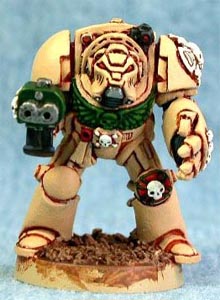
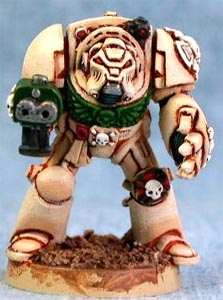
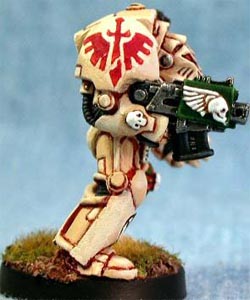
Step 4 Continued: The gun casing is done just like a standard DA trooper. The reds and black are done similar to ways that have already been discussed in the tutorial. The green chest eagle has a slight deviation from normal. It starts with a DA Green base. It then gets a 50/50 DA/Snot for the first highlight. Pure Snot Green is the 2nd highlight and this is finished off with a 50/50 Snot/Goblin highlight. |
Step 6 - The areas in Ivory are then given a single Skull White highlight. This is to make those portions of the armor really stand out from the Bone colored armor later on. |
Step 7 - This is the most time consuming of all the steps. This will usually take 2-3 coats of Bleached Bone. You cover the armor areas in Bleached Bone, leaving a thin line of the fleshwashed base coat showing through. |
">
">
">
">
">
">
">
">
">
">
">
">
Step 8 - Next you go back over those areas with NITROs Bone, as in the Robe section, (2 parts Bleached Bone to 1 part Skull White) This is a large highlight basically, you'll leave some areas of Bleached Bone exposed. |
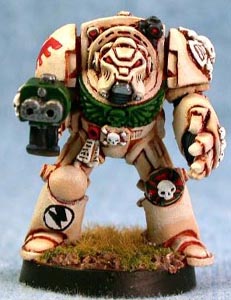
Step 9 - The proper army badge and the Deathwing emblem are placed. Decals were then painted over after being set properly. Other finishing touches such as the writing on the Purity Seal were done with a 005 Pigma Micron pen. |
Stage 5: Areas that are going to be skull white are first given a coat of Vallejo Ivory. |
INTRODUCTION: The following tutorials were something I promised to do for Shadow Guard as part of the Raven Wing Project I am working on for him. Most are quick and easy. They aren't meant to give you tips on winning a golden demon or any other painting prize. They are however a way to have a decent looking army in a short amount of time. Many times in these tutorial your going to see non-GW paint names. I have nothing against GW paint, I think it is great stuff. The bottles for it on the other hand..bleh. So where possible I will include a GW equivalent (or close enough for government work) for the colors I use. That said, please understand that these are how I do these particular things. It is not the Games Workshop way, the Cool Mini or Not way, heck some might say it is not even the "right" way. All I can promise is that it works and if you choose to follow it, your army will at least be presentable on the table. Above anything though I hope that folks who are looking to start painting or improve their painting can learn something. So any comments / critiques you want to fire at me feel free: [ email: menshakhaine@hotmailcom ] |