INTRODUCTION: The following tutorials were something I promised to do for Shadow Guard as part of the Raven Wing Project I am working on for him. Most are quick and easy. They aren't meant to give you tips on winning a golden demon or any other painting prize. They are however a way to have a decent looking army in a short amount of time. Many times in these tutorial your going to see non-GW paint names. I have nothing against GW paint, I think it is great stuff. The bottles for it on the other hand..bleh. So where possible I will include a GW equivalent (or close enough for government work) for the colors I use. That said, please understand that these are how I do these particular things. It is not the Games Workshop way, the Cool Mini or Not way, heck some might say it is not even the "right" way. All I can promise is that it works and if you choose to follow it, your army will at least be presentable on the table. Above anything though I hope that folks who are looking to start painting or improve their painting can learn something. So any comments / critiques you want to fire at me feel free: [ email: menshakhaine@hotmailcom ] This tutorial is effectively a combination of the Dark Angel and DeathWing tutorials from earlier on. So to save time this won't be quit as in depth, but will reference previous areas in the tutorial section. |
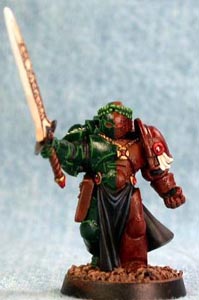
PAINTING MASTERCLASS ANGELS OF REDEMPTION MARINE By Matthew Hunt ( Kurgan ) |


PAINTING THE UNFORGIVEN |


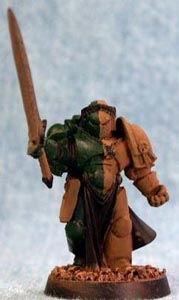
Step 1 - The mini has been primed black and then had its base coat (half-n-half) of Dark Angels Green on the right and Cleric Brown on the left. Cleric Brown was also place anywhere that leather or lighter bone work would be done later on. |
">

">
">
">
">
">
">
">
">
">
">
">
Step 2 - A dark green ink wash was given on the right side and flesh wash was given on the left side and the leather/sword areas. You can use Chestnut ink if you want a lighter brown. |
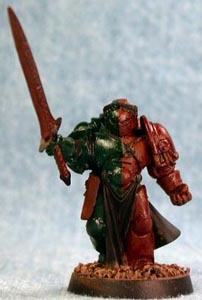
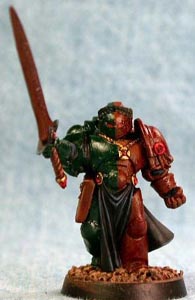
Step 3 - Reds were done in a similar fashion to areas already covered in the tutorial. Gem effects were used on the gems and eye visor. |
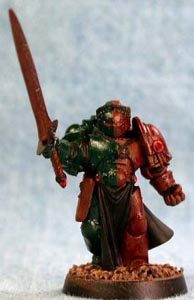
Step 4 - Shining Gold, followed by a burnished gold highlight, was used on the necklace and mountings for the gemstones. |
">
">
">
">
">
">
">
">
">
">
">
">
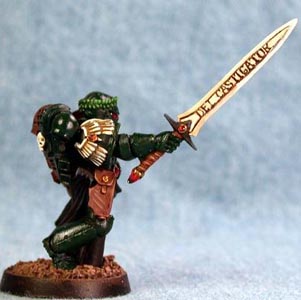
Step 5 - Leather areas were highlight first with East Indian Brown and then finished with Asian Flesh tone. |
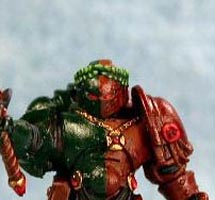
Step 9 - The Dark Angel green side of the mini was highlighted next. First with a 50/50 DA/Snot Green mix. This was then followed by a final highlight of pure Snot Green. |
Step 6 - Black areas (ribbing, tabard and sword hilt) were first highlight with a two parts Shadow Grey to one part Chaos Black mix. This was followed up with a second highlight of Nightfall Blue. |
">
">
">
">
">
">
">
">
">
">
">
">
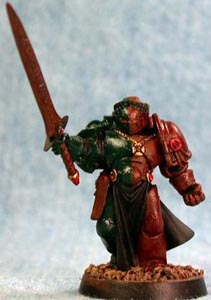
Step 7 - The laurel wreath began with a Dark Angels Green base coat. It was then highlighted in successive layers, with each new color covering about 50% of the previous. Colors used after the DA Green were a 50/50 DA/Snot mix, Snot Green, 50/50 Snot/Goblin and the final highlight being Scorpion Green. |
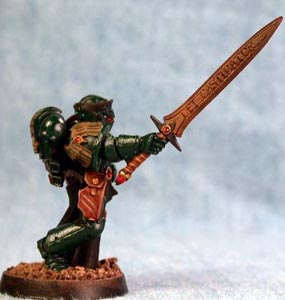
Step 8 - The sword, shoulder eagle, backpack skull and purity seal parchment are all brighter shades of "bone" than that on the left side armor. As with the Deathwing, they started with a Bleach Bone base. NITRO's Bone was the first highlight, followed by Vallejo Ivory and finished with GW Skull White. |
INTRODUCTION: The following tutorials were something I promised to do for Shadow Guard as part of the Raven Wing Project I am working on for him. Most are quick and easy. They aren't meant to give you tips on winning a golden demon or any other painting prize. They are however a way to have a decent looking army in a short amount of time. Many times in these tutorial your going to see non-GW paint names. I have nothing against GW paint, I think it is great stuff. The bottles for it on the other hand..bleh. So where possible I will include a GW equivalent (or close enough for government work) for the colors I use. That said, please understand that these are how I do these particular things. It is not the Games Workshop way, the Cool Mini or Not way, heck some might say it is not even the "right" way. All I can promise is that it works and if you choose to follow it, your army will at least be presentable on the table. Above anything though I hope that folks who are looking to start painting or improve their painting can learn something. So any comments / critiques you want to fire at me feel free: [ email: menshakhaine@hotmailcom ] This tutorial is effectively a combination of the Dark Angel and DeathWing tutorials from earlier on. So to save time this won't be quit as in depth, but will reference previous areas in the tutorial section. |