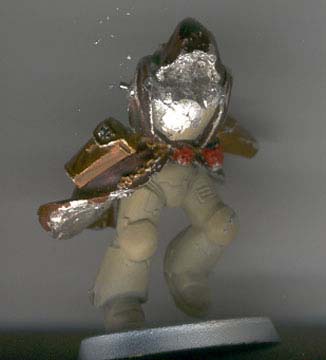
Step 2 - Preparing the body. The first step was to try and make the model look like he was charging. The Cypher figure had a hood and flowing robes to depict dynamic movement. But the leg were too immobile. The first major effort was focussed on removing the existing pewter legs. Be warned that this process of very time consuming, and need extreme care to prevent the model cracking. I managed to do thi by first cutting what I could and then slowly digging the rest of the legs out withthe tip of the citadel clipper. (figure 03) ( I don't have access to a modelling power drill) I then used one of the assault marine legs and ositioned the upper body on it with blue tac. A n assault marine bolt pistol arm was added and the over all look was quite satisfactory. (figure 04) |
INTERROGATOR CHAPLAIN SHADOW GUARDS CHAPTER By ( Shadow Guard ) |


CHARACTER CONVERSIONS |
Step 1 - Selecting the miniature: All the chaplain models in the GW range suffer from the "stand or trot while waving both arms syndrome" and the only one with a robe, "Asmodai" had already donated his body to my techmarine. I initially chose the the most dynamic chaplain figure in the Citadel range, shown below. I planned (rather hoped!) to add a cloak out of miliput putty) The first convertion I did was to remove the head of the crozius and pin it to the bottom of its staff. I then removed the head of another crozius from another model and pinned it to the top end. (figure 1) It was a much better head, and made the weapon stand out. But I was no good with sculpting robes at this stage so had to go with selecting one of the robed miniatures. In came the cypher model since it was the only robed model I hadn't used up. (figure 2) I had originally painted him up as my Master of the second company, but didn't like it, and had replaced him with the limited edition Black Templar Captain figure. Besides, which Dark Angel could resist bringing Cypher to the Emperor's Light?? |
">

">
">
">
">
">
">
">
">
">
">
">
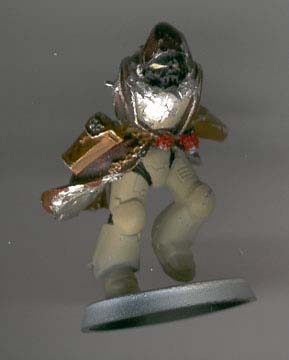
Step 4 - A little face-lift: At this stage, what was most obvious was the unovered face and loose hair of the Cypher figure. Completely out of sync with the concept of a pious Chaplain. I needed a chaplain's skull mask on that face. So I set about slowly and tediously coring out the face, using the citadel hand drill and clippers. (A power drill would have definitely made ife easier) (figure 05) Once enough room was cored out, I removed the skull mask head from the same chaplain whose crozius I had "borrowed" and cut it vertically to let me insert it in to the space. (figure 06) |
Birth of a Shadow Guard Interrogator - Chaplain: Initial concepts and Thought Process Having completed my 1500 point Shadow Guard Army I set about creating the next 500 points. The core of my army was mechanised and made out for a mobile and firepower based army. The models all posed in a way that represented steady firing poses. So I decided that the next lot was going to be assaulty. I had planned a ten man assault squad, each posed with different close combat or power weapons. I needed a chaplain to lead the aasault and it had to be a dynamically posed model to accompany my charging assault squad. What I wanted to create was a charging chaplain in a very threatening and imposing mood armed with a master-crafted crozius arcanum and a bolt pistol. |


Figure 1 |
Figure 2 |
Figure 3 |
Figure 6 |
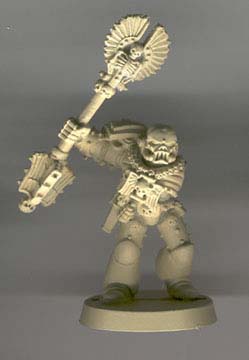
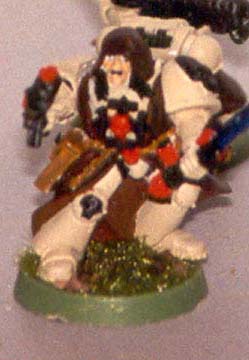
Figure 1 |
Figure 2 |
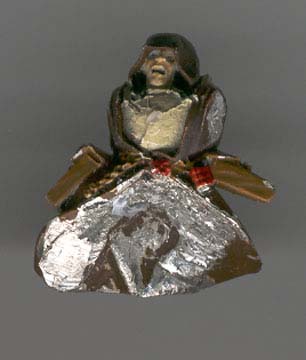
Figure 3 |
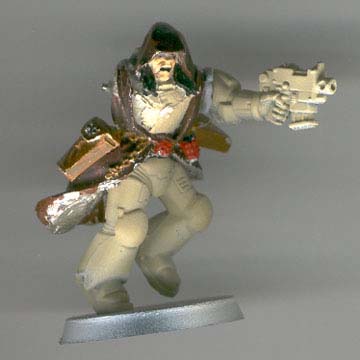
Figure 5 |
Figure 4 |