PERSONALIZING A RAVENWING LAND SPEEDER I'm a very lazy person so when I buy a miniature I'm anxious about seen it finished. Everybody wants 'Eavy Metal level at painting, but when you're a lazy person like me you think "they're gods, I'm just a human". Actually, we, the simple humans also have some good technics to have great results, may be aren't 'Eavy Metal quality, but when you see them you think "yeah, they're my miniatures and I'm proud of them". Making little conversions you can improve the appearance of the miniatures, sitting calmly a few hours can be relaxing (prove it when you have examinations! but only if you'll could stop painting) and finally in the middle of a bloody battle when you see them you get pleased. A week ago I bought a Land Speeder, when I was thinking about it I thought that spending only one or two days the result will be sufficiently good to be proud. I thought about colours, the armour and marines will be chaos black with codex grey and fortress grey lights (yes, I like strong lights), metallic zones with boltgun metal and mithril metal lights. Some of my friends who are new at the hobby don't light, but it's really easy to light a miniature, and the effect is quite good. Another question is decorative details, but I speak about them later. Without more introductions I explain the steps that I follow. |
MODELLING A RAVENWING LANDSPEEDER By Carlos Fernandez (Karze) |


VEHICLES & WARMACHINES |
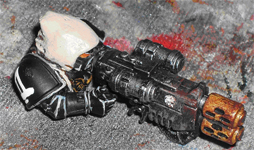
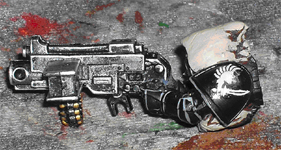
Step 1: Assembling & transforming crew. After separating and cleaning them of imperfections I think to make the crew more Dark Angelical, this means make robes for them. Assemble the pilot's body, seats, backs of the seats and controls. But if you want a mobile artilleryman don't glue it now. After that, you can make the robes for the pilot, I don't specify how because in the Fortress of Unforgiven you can found two excellent articles about that (and probably have better explanation than my own explanation). Also I changed the head by a sergeant head, this sound as a simple change but using a different head for a miniature yo can personalize it a lot (try to put a motorbike sergeant put out of hatch in any of your tanks, the effect is really good). Beware of the position of the pilot's arms, may be you should assemble them after assembling the "chassis" of the land speeder. I had a ravenwing |
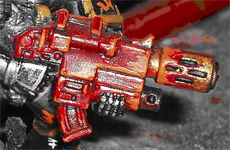
Step 2: Painting Painting a ravenwing vehicle is easy because the chaos black undercoat does the hardest work Yes, it's really lovely! So, when you have undercoated it probably you should have to paint the areas where the spray hasn't arrived. After that you can really start to paint, I've used only thirteen colours: codex grey, fortress grey, scorched brown, bestial brown, bleached bone, skull white, burnished gold, red gore, blood red, fiery orange boltgun metal, mithril silver and elf flesh. First of all paint metallic zones with blotgun metal drybrush, this includes the heavy bolter or the multi-melta. After that, light metallic zones with another drybrush, this time with mithirl silver but with really little paint. For the weapon I prefer not to do a drybrush to light, lighting all the edges with a thin mithril line, this makes a better effect in small objects than a drybrush. Painting details is easier if you have lighted before, so light with codex grey all the chassis, try to light each edge of the armour. To make the lights, use fortress grey, but pay attemption and only light the most convex zones. If you make too many lights with fortress grey it'll be too artificial. Repeat same process for the servo armours of the crew, with a thin paint-brush try to make some lines with mithril in metallic unions of the armour. I think the best way to paint gems or any lens is the way described in codex: eldars use three tones (dark, middle and bright) and bone white. I've painted the lens in the land speeder with red tones. |
">

">
">
">
">
">
">
">
Figure 6 |
Figure 7 |


First of all paint the entire lens with blood red, then make a half-moon with a darker tone (in that case with gore red) in the lightest side, in the opposite side paint another half-moon but with the brightest tone (fiery orange). Finally make a tiny point or line crossing the lightest side. This is a great technique and it's useful for lots of details. The big turbines in the back are quite easy to paint, just drybrush with boltgun metal the turbines, and light with a bit of mithril. Giving the rusty aspect is easy too; first make a charged drybrush with scorched brown, then another one but this time with bestial brown. I've said that is really easy obtaining a rusty aspect, isn't it? Painting flesh is as easier as rusty metals, I always use this simply method: first paint the flesh with scorched brown, try to not cover deeper wrinkles; then paint it with bestial brown, this time don't paint any wrinkles; next step is to paint with elf flesh (think this method is only for bright flesh), paint all the flesh except the wrinkles and a tiny lines between wrinkles and the rest of the flesh (this may be in bestial brown). Finally paint the eyes, the easiest way is painting them with skull white and then painting a small chaos black point, pay attention and make them in the same direction if you don't want a squinting marine. Another important point: painting robes, this can be easy but with great results, the method I use is like painting flesh. First paint the entire robes with scorched brown and then apply bestial brown and finally bleached bone. As I said, it's really easy. Last thing before the details is the weapon, if it's a heavy bolter paint it as I've said and then paint the skull with skull white, I like painting the munition with burnished gold, but this is absolutely optional. If it's a multi-melta you have two good choices, paint as the heavy bolter, then paint the mouthpiece with burnished gold and apply it a rusty aspect with scorched brown and bestial brown. Another way to the multi-melta is emulating the aspect of the fire in the entire surface, except the mouthpiece. You can do coating the weapon with gore red, lighting it with blood red and finally painting small flames with fiery orange. |
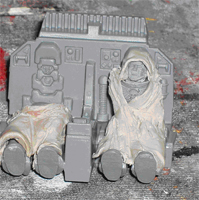
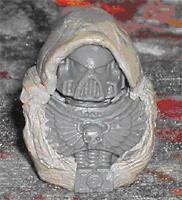
shoulder of a blister of veteran dark angles, so I put it in the pilot: I only have one, so I decided put it in the pilot because the pilot's right shoulder is the outer. In this step you should make the robes for artilleryman's legs, but take care of make the form for the body or you won't place it after. The better way is putting the body without glue and making the correct form for the robes of the legs. When you have finished that you can continue assembling the rest of the land speeder, but remember not to glue the artilleryman, you should assemble it separately and make robes for him with more green stuff. Be careful with the green stuff and the artilleryman's arms, they are united so be sure that they can be placed correctly before the green stuff is completely dry. |